How To Verify Your Blogger Blog On Pinterest

Getting Pinterest Verification Code:
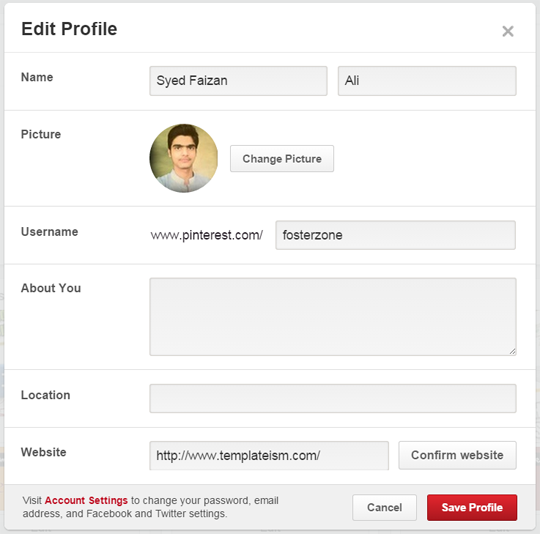
The very first thing that you need to do is to login to your Pinterest account and click on your display name. Now select the “Edit profile” button located at the top right corner of your screen.
Now a pop will appear on your screen, it consists of your profile details. At the very bottom you will notice “Website” option. Now enter your website URL and press the confirm button.

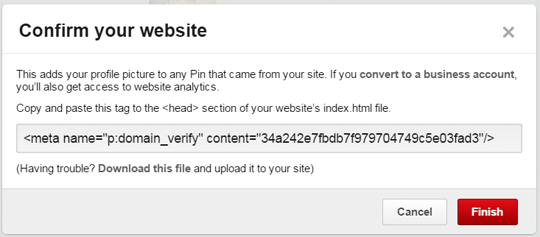
Now again a pop will appear, this time it provides you the options through which you can verify your website with Pinterest. Simply copy the Code which is Meta tag that you need to put on your website to be verified. After copying the code, move to the next step but be sure not to close this window you’ll need to “Finish” the process after adding the code.

Adding Pinterest Verification Code in Blogger:
Go Blogger >> Template >> Edit HTML >> Search for <head> tag and just below it paste the code you copied earlier. Once you are done, press “Save Template”.You now need to head back to Pinterest, and press that “Finish” button. Upon clicking finish you will see website successfully verified notice.
This not only gives your site a quality backlink, makes your site a merk on Pinterest but you can also now see the analytics of your site that how it is performing on Pinterest.
We would suggest you to also add Pinterest pin it button on your site, this will give your site more exposure and make your merk successful over Pinterest. You can also try our Pinterest Pin button when hover on images that is also an handy widget.
We hope this tutorial will help all photography bloggers to take most benefit out of Pinterest. Do share your thoughts in the comment below or write us at Facebook, Google+ or Twitter.


